When disaster strikes a WordPress website—whether through a cyberattack, plugin failure, or accidental deletion—it’s easy to feel overwhelmed. But savvy website owners know the secret weapon in these situations is a reliable backup. This blog post is your guide to manually restoring a WordPress website from a backup, ensuring you can quickly bounce back from unexpected mishaps.
In this post, we’ll demystify the manual restoration process, breaking it down into digestible steps that are easy to follow, even if you’re not a tech wizard. You’ll gain insights into why backups are essential, explore various restoration methods, and learn a step-by-step manual process that puts control back in your hands. Whether you’ve faced a site calamity or are simply preparing for potential issues, this guide is here to equip you.
The Essential Role of Backups in Website Management
Imagine waking up to find your website defaced or inaccessible. It’s a nightmare scenario for any business owner. This is where the power of backups comes into play. By maintaining regular backups of your website’s files and database, you have the capability to revert your site to its previous state, minimizing downtime and potential revenue loss.
Even seasoned developers encounter unforeseen problems, from incompatible plugins to corrupted files. Regardless of your expertise, a recent backup can be your saving grace, getting your site back online quickly.
Why You Might Need to Restore a WordPress Backup
There are numerous reasons why a backup restore might become necessary. Cyberattacks can compromise your site, while theme or plugin conflicts might disrupt its functionality. A user error, like accidentally deleting critical files, can also necessitate a restore.
The key takeaway here is to always be prepared. Having a backup means you’re not starting from scratch but rather reverting to a known working state, providing peace of mind and a quick recovery path.
Exploring Various Restoration Methods
There are several avenues for restoring a WordPress backup. Plugins like UpdraftPlus and BlogVault offer automated solutions, but they can be restrictive. Hosting providers often include backup features, but they may store backups on the same compromised server.
The most foolproof approach? Manually restoring your backup. This method gives you full control over the process, ensuring your site’s integrity and data security.
Step-by-Step Guide to Manual Restoration
Step 1 Log in to Your Hosting Account and Access phpMyAdmin
Begin by logging into your hosting account and navigating to phpMyAdmin, the tool that manages your WordPress database. In cPanel, you’ll typically find it under the Databases section.

Accessing phpMyAdmin allows you to interact directly with your site’s database, a crucial step in the restoration process.
Step 2 Import Your Backup Database
With phpMyAdmin open, choose whether to empty the existing database or create a new one for your backup. If opting for a new database, remember to update your `wp-config.php` file with the new credentials.
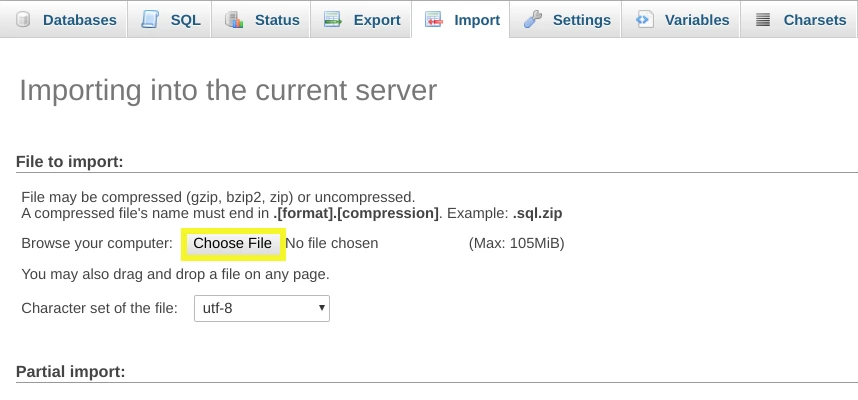
To import your backup, click the Import tab in phpMyAdmin.

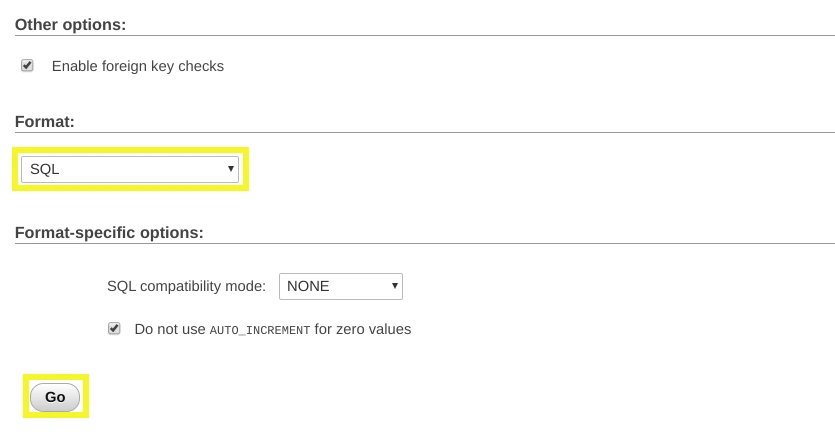
Select your backup file, ensure the format is set to SQL, and hit Go.


Once complete, your database should be restored.
Step 3 Install and Log in to Your FTP Client
Next, you’ll restore your WordPress files. Use an FTP client like FileZilla to connect to your server. You’ll need your FTP credentials, available in your hosting account.

Log in to FileZilla and ensure a successful server connection. This setup lets you manage and transfer files between your computer and server.
Step 4 Upload Your WordPress Backup Files
On FileZilla, locate your local backup files on the left and your server on the right. Make sure your backup is unzipped and accessible.

Delete old files from the server before uploading your backup. Drag and drop the files from your computer to the server. Monitor the upload process to ensure all files transfer successfully.
Step 5 Verify Your Site’s Restoration
With the transfer complete, visit your website to confirm the restoration. Check plugins and ensure links are functional. Address any permalink issues via Settings > Permalinks in your WordPress dashboard.
For added security, update your admin password and consider enforcing new passwords for all users.
Conclusion Ensuring Future Stability
Restoring a WordPress site from a backup is a crucial skill for any site owner. Whether facing a hack or technical glitch, this knowledge empowers you to take control and minimize disruptions.
By following the outlined steps, you’ll be able to restore your site with confidence. Remember, maintaining regular backups is your safety net.
What’s your experience with WordPress backups and restoration? Share your insights and questions in the comments below!


Comments